How to Clean Your AirPods: A Complete Step-by-Step Guide
Keeping your AirPods clean is essential for maintaining sound quality, hygiene, and overall performance. Over time, earwax, dust, and bacteria can accumulate on the speaker mesh, rubber tips, and inside the charging case. This guide walks you through the entire cleaning process safely and effectively, ensuring your AirPods stay in top condition for years to come.
Whether you own standard AirPods, AirPods Pro, or AirPods Max, the cleaning principles remain similar. The key is to be gentle, use the right tools, and clean regularly. Let’s dive into each step in detail.
Why Cleaning Your AirPods Matters
Before we get into the actual cleaning steps, it is worth understanding why this maintenance matters so much:
- Sound Quality: Blocked speaker mesh reduces volume and clarity. Earwax and debris physically obstruct sound waves, making your music sound muffled or distant.
- Hygiene: AirPods sit inside your ears for hours, collecting bacteria, sweat, and skin oils. Without regular cleaning, this buildup can lead to ear infections or skin irritation.
- Longevity: Proper maintenance extends the lifespan of your AirPods. Corrosion from sweat and moisture can damage internal components over time.
- Resale Value: If you ever plan to sell or trade in your AirPods, clean ones hold significantly more value than dirty, neglected ones.
Now that we understand the importance, let’s begin with the most critical area — the speaker mesh.
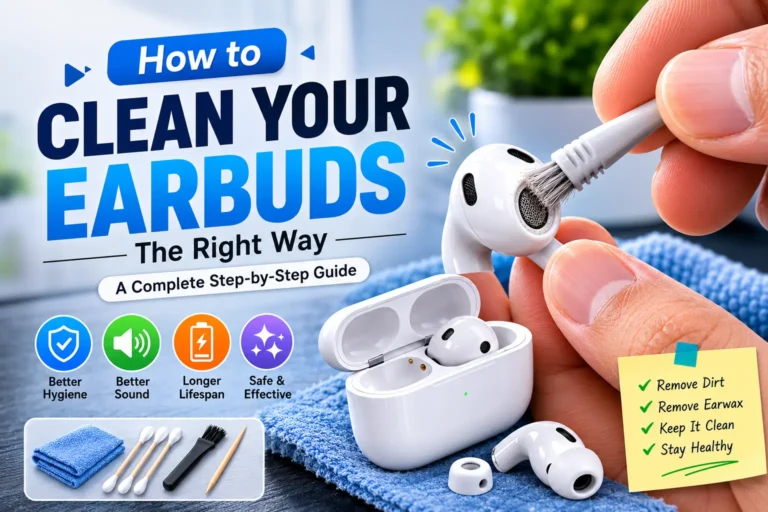
Clean the Speaker Mesh with a Soft Brush
Start by cleaning the speaker mesh, which is the part that directly connects with your ear. This is the most vulnerable area where dirt, earwax, and debris can easily accumulate. The speaker mesh has tiny holes that allow sound to pass through, and when these holes get clogged, audio quality suffers immediately.
What You Will Need
- A soft-bristled toothbrush (preferably one you do not use for your teeth anymore)
- A clean microfiber cloth
- Isopropyl alcohol (70% or higher, optional for disinfection)
- Good lighting so you can see the mesh clearly
Steps to Clean the Speaker Mesh
Step 1: Inspect the mesh under good light. Before you begin, take a close look at the speaker mesh. You will likely see a buildup of wax or debris, especially around the edges where the mesh meets the plastic casing. This visual check helps you identify the areas that need the most attention.
Step 2: Use a soft toothbrush. Make absolutely sure the toothbrush is soft enough to avoid damaging the delicate components of your AirPods. A hard-bristled brush can scratch the mesh or push debris further inside, making the problem worse rather than better. An unused baby toothbrush works perfectly for this task.
Step 3: Brush gently and carefully. Gently brush the mesh area, especially around the holes where dirt tends to build up. Use light, circular motions rather than aggressive back-and-forth scrubbing. Do not apply too much pressure, as this can harm the mesh and potentially damage the internal speaker components behind it. The goal is to loosen the debris, not force it deeper.
Step 4: Angle the brush slightly. Hold the brush at a slight angle so the bristles can reach into the tiny openings without pressing directly down on the mesh. This technique helps lift debris out rather than pushing it in.
Step 5: Wipe away loosened debris. After brushing, use a dry microfiber cloth to gently wipe away any loosened particles. The microfiber material attracts dust and prevents it from resettling on the mesh.
Step 6: Repeat if necessary. For stubborn buildup, you may need to repeat the brushing process two or three times. Be patient — aggressive cleaning can cause more harm than good. If the mesh is heavily blocked, consider using a small amount of isopropyl alcohol on the cloth (not directly on the AirPods) to help dissolve stubborn wax.
Soak the Rubber Tips in Alcohol
For AirPods Pro users, the rubber tips can accumulate dirt, bacteria, and oils from your skin over time. These silicone tips create a seal inside your ear canal, which means they collect everything from sweat during workouts to natural earwax throughout the day. Cleaning the rubber tips is an essential step to maintain both hygiene and performance.
Why Separate Cleaning Matters
The rubber tips are removable for a reason — Apple designed them this way specifically so they could be cleaned independently. Many users overlook this step entirely, allowing bacteria to thrive on the tips even when the rest of the AirPods appear clean.
Steps to Clean Rubber Tips
Step 1: Remove the rubber tips carefully. Gently pull the silicone tips off each AirPod. They should come off with a firm but gentle tug. Avoid pulling at an angle that could tear the silicone.
Step 2: Prepare the cleaning solution. Use isopropyl alcohol (70% concentration works well). Pour a small amount into a clean container — just enough to submerge the tips.
Step 3: Soak the rubber tips. Place the tips in the alcohol and let them soak for about 10 to 15 minutes. This will help dissolve earwax, remove dirt, and disinfect the tips from bacteria and germs.
Step 4: Gently scrub after soaking. After the soaking period, use a soft brush or your fingers to gently rub away any remaining debris. The alcohol would have loosened most of the buildup, making this step quick and easy.
Step 5: Rinse with clean water. Give the tips a quick rinse under clean, running water to wash away the alcohol and any remaining residue.
Step 6: Dry thoroughly. This is perhaps the most important step. After cleaning, dry the tips carefully with a clean cloth. Make sure they are completely dry before reattaching them to your AirPods. Any moisture trapped between the tip and the AirPod body can seep into the internal components and cause damage over time. Allow them to air dry for an additional 15-20 minutes if needed.
Use a Hairdryer on Cold Setting
After cleaning, moisture can still remain on the surface, which could potentially harm your AirPods if not dried properly. Even tiny amounts of water can corrode the charging contacts or seep into the speaker assembly. To prevent this, use a hairdryer on the cold setting to thoroughly dry them.
Why Not Use Heat?
Heat is the enemy of electronics. AirPods contain lithium-ion batteries, delicate plastic components, and precision drivers. Exposing them to hot air can warp the plastic, damage the battery, or loosen the adhesive that holds internal components together. Cold air is completely safe and equally effective for drying.
Steps for Safe Drying
Step 1: Set the hairdryer to the cold setting. Most modern hairdryers have a dedicated cold air button or a switch that disables the heating element entirely. Confirm the air coming out is genuinely cool before directing it at your AirPods.
Step 2: Maintain a safe distance. Hold the hairdryer at least 15-20 centimeters (6-8 inches) away from the AirPods. Getting too close can create pressure that pushes moisture deeper into the device.
Step 3: Blow cool air gently. Move the hairdryer around so the air hits all sides of the AirPods evenly. Pay special attention to the speaker mesh and the charging contacts at the bottom, as these areas trap moisture most easily.
Step 4: Continue until completely dry. Keep blowing cool air until the AirPods feel completely dry to the touch. This usually takes about 1-2 minutes per AirPod.
Clean the Charging Case
Do not forget to clean your AirPods case, as this is where bacteria can accumulate over time. Think about it — the case goes into pockets, bags, and onto various surfaces throughout the day. It picks up everything from lint to germs, and those germs then transfer to your AirPods and eventually to your ears.
What You Will Need
- A clean microfiber cloth
- A small amount of water (barely damp, not wet)
- A dry cotton swab or Q-tip for tight corners
- Isopropyl alcohol (optional, for disinfection)
Steps to Clean the Charging Case
Step 1: Wipe the exterior thoroughly. Use a microfiber cloth to clean the case’s exterior. This will remove fingerprints, dirt, and grime that accumulate from daily handling. The microfiber material is gentle enough not to scratch the glossy finish of the case.
Step 2: Clean the interior carefully. Gently wipe the interior of the case with a slightly dampened cloth. Be extremely cautious around the charging contacts at the bottom of each earpiece slot. Avoid getting any moisture in the charging ports or speakers. A dry cotton swab can help reach into the deep corners of the case where the AirPods sit.
Step 3: Clean the lid hinge. The hinge area collects dust and debris over time. Use a dry cotton swab to gently clean around the hinge mechanism. Do not use any liquid near the hinge, as it can seep into the internal electronics.
Step 4: Disinfect optionally. If you want to sanitize the case, lightly dampen a cloth with isopropyl alcohol and wipe the exterior. Avoid using alcohol inside the case, as it may damage the felt lining or seep into the charging components.
Step 5: Let the case dry completely. Before placing your AirPods back inside, make sure the case interior is fully dry. Any remaining moisture can transfer to your AirPods and cause problems.
Repeat the Cleaning Process Weekly
To maintain your AirPods in good condition, it is important to clean them on a regular basis. Aim for at least once a week, especially if you use your AirPods during physical activities like exercising, where sweat can accumulate more quickly.
Why Weekly Cleaning Is Important
- Prevents Buildup: Regular cleaning stops debris from accumulating to the point where it becomes difficult to remove.
- Maintains Sound Quality: Clean speakers mean consistently clear audio without gradual degradation.
- Protects Your Health: Weekly disinfection reduces the bacterial load on your AirPods, lowering the risk of ear infections.
- Saves Time: A quick weekly clean takes only a few minutes, while deep cleaning neglected AirPods can take much longer.
Quick Weekly Cleaning Routine
- Brush the speaker mesh lightly with a soft toothbrush.
- Wipe the AirPods body with a dry microfiber cloth.
- Check the rubber tips for visible debris (AirPods Pro users).
- Wipe the charging case exterior and interior quickly.
- Dry everything before placing back in the case.
What Not to Do When Cleaning AirPods
Equally important as knowing what to do is knowing what to avoid:
- Do not submerge AirPods in water. Even though newer models have some water resistance, full submersion can cause permanent damage.
- Do not use bleach or harsh chemicals. These can damage the plastic, silicone, and internal components.
- Do not use sharp objects like pins or paperclips to clean the speaker mesh. This can puncture the delicate diaphragm behind the mesh.
- Do not use compressed air at close range. High-pressure air can force debris deeper inside and damage internal components.
- Do not charge wet AirPods. Always ensure everything is completely dry before placing AirPods back in the charging case and connecting to power.
Frequently Asked Questions
How often should I clean my AirPods?
Once a week is ideal for regular maintenance. If you use them during workouts, consider wiping them down after each exercise session.
Can I use water to clean AirPods?
A slightly damp cloth is acceptable for the exterior, but avoid getting water near any openings, including the speaker mesh and charging contacts.
Is isopropyl alcohol safe for AirPods?
Yes, 70% isopropyl alcohol is safe for the rubber tips and the exterior plastic body. Avoid using it directly on the speaker mesh or inside the charging case.
What should I do if the speaker mesh is heavily clogged?
Try multiple gentle brushing sessions with a soft toothbrush. If the mesh remains blocked, you can use a tiny amount of isopropyl alcohol on the cloth to help dissolve stubborn wax. If that does not work, consider professional cleaning.
Can cleaning improve the sound quality?
Absolutely. Removing earwax and debris from the speaker mesh directly improves volume and clarity, often making AirPods sound like new again.
Conclusion: Keep Your AirPods Clean for Optimal Performance
Regular cleaning of your AirPods will not only help maintain their performance and extend their life but will also keep them hygienic, protecting you from bacteria and ear infections. Additionally, cleaning the charging case is crucial for keeping everything in top shape.
While cleaning, remember to avoid sharing your AirPods with others due to sanitary reasons, especially if they have not been cleaned properly. Ears are sensitive environments, and sharing uncleaned earbuds can transfer bacteria and germs between individuals.
By following these simple cleaning steps — brushing the speaker mesh, soaking rubber tips, drying with cold air, wiping the case, and maintaining a weekly routine — you can enjoy your AirPods at their best for years to come. A few minutes of care each week makes all the difference between AirPods that sound crisp and clear and ones that sound muffled and tired.